As the most cost-effective embedded vision application development platform on the planet, the Digilent Zybo-Z7, once launched last year, has captured the hearts of many Zynq enthusiasts with its gorgeous Zynq devices and various onboard peripheral interfaces. This is not to mention the industry-standard entry-level Zynq-7000 platform and also comes with SDSoC Vochuer for free!
This gift can be used to arouse the waves. For the Digilent community users who have been coveting SDSoC for a long time, these benefits will not be missed. However, as a moderator, I have received a lot of questions about SDSoC development. Following the previous article, we talked about "How to get started with SDSoC development tools on the Zynq development board". In response to the needs of the Digilent open source community users, today we will come back to the "SDSoC hook openCV guide" to teach you how to use Zybo-Z7. Create an OpenCV-based SDSoC project.

Remind before the opening:
1. In this tutorial, the version of SDSoC used is 2015.4.
2. OpenCV requires Linux to be easy to use because it uses many libraries, such as pthread. . Nothing about bare metal configuration will be covered in this article.
1. Software and hardware listâ— SDSoC
â— Zybo Z7
â— Platform with Linux kernel + root file system
â— Computer with Linux system
2. Get OpenCVYou can have at least two options for this step. One is to download and cross-compile the library ( docs.opencv.org/2.4/doc/tutorials/introducTIon/crosscompilaTIon/arm_crosscompile_with_cmake ); the second is to get a library that has been cross-compiled. . In this tutorial, we have already established OpenCV 2.4.5 in the SDSoC installation folder.
3. Modify the platformHere we need to add the compiled library to the root filesystem of the SDSoC platform you want to use for your project. After this step, the executable (your application) will be able to load the library. The file system image type used in the Zybo Z7 platform is initramfs. If you have another image type on hand, you can get more information on the Xilinx wiki: +and+Modify+a+Rootfs
3.1 Copy the root file system to a temporary folder
Paste the archive copy named "uramdisk.image.gz" in the startup folder of the platform into a temporary folder. Open the terminal and go to the folder.
3.2 Remove the U-BOOT header file to get the CPIO archive
Dd if=uramdisk.image.gz bs=64 skip=1 of=ramdisk.gz
3.3 Compress the new CPIO archive into a newly created folder
Mkdir my_root
Gunzip -c ramdisk.gz | sh -c 'cd my_root/ && sudo cpio -i'
3.4 Copy library and header files (-P save link)
Sudo cp -p /opt/Xilinx/SDSoC/2015.4/SDK/2015.4/data/embeddedsw/ThirdParty/opencv/lib/* my_root/lib/
Sudo cp -r /opt/Xilinx/SDSoC/2015.4/SDK/2015.4/data/embeddedsw/ThirdParty/opencv/include/* my_root/usr/include/
3.5 Compression to CPIO and GUNZIP
Sudo sh -c 'cd my_root/ && find . | cpio -H newc -o' | gzip -9 》 my_ramdisk.image.gz
3.6 Adding a U-BOOT Header File
Mkimage -A arm -T ramdisk -C gzip -d my_ramdisk.image.gz my_uramdisk.image.gz
Here you need to make sure the file permissions are set to 755:
Sudo chmod 755. /my_uramdisk.image.gz
3.7 Replacing a newly created image in the platform
Cp. /my_uramdisk.image.gz /pathToZyboPlatform/boot/uramdisk.image.gz
4. Create and configure a new project in SDSoCCreate and configure a new project in SDSoC
4.1 Adding an include path
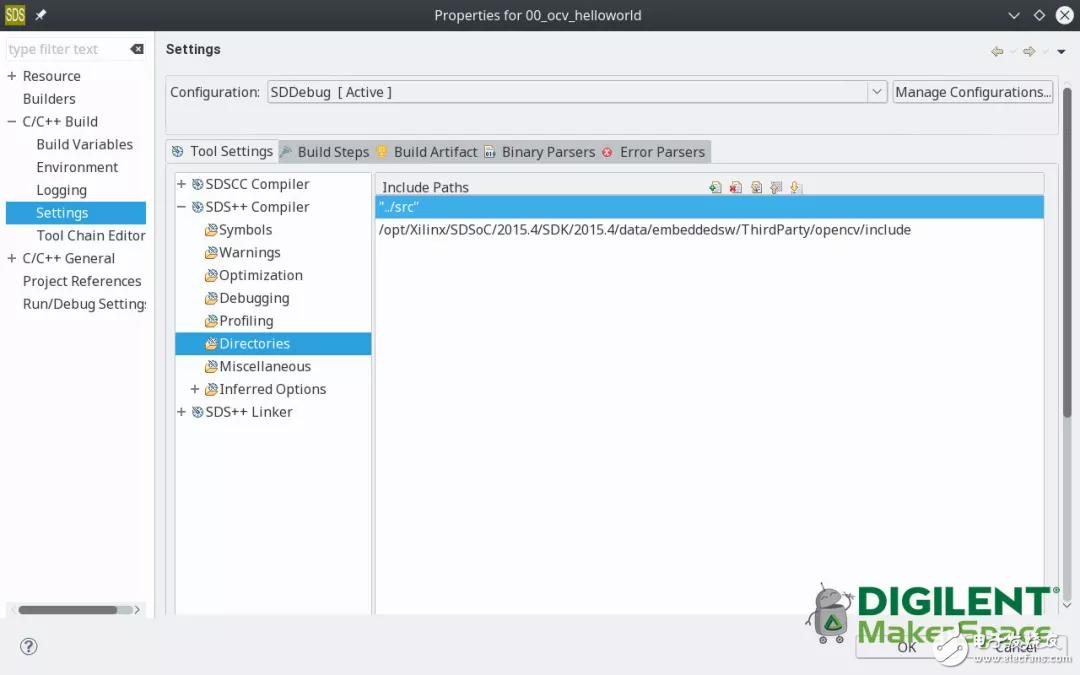
Create a new project, choose your modified platform, and choose the one you want to use for Linux. Right-click the project in the project explorer (left panel) and click Properties. Go to "C/C ++ build" - "Settings" - "SDS ++ Compiler" - "Directory", add OpenCV include path for the selected "build/debug/esTImate configuration" (/opt/ Xilinx/SDSoC/2015.4/SDK/2015.4/data/embeddedsw/ThirdParty/opencv/include), as shown below:

4.2 Link Library
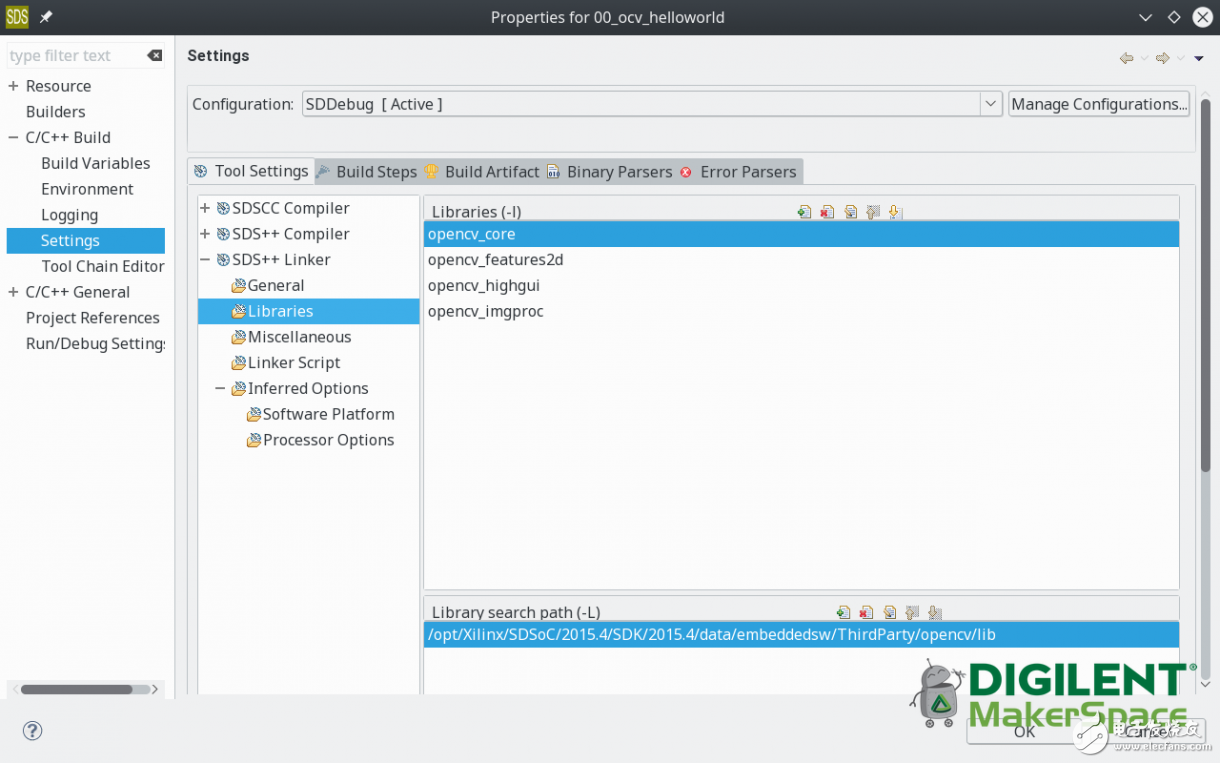
When you're done, go to SDS ++ linker's configuraTIon and under "Library", add the libraries you want to use in your project and where they are located (I am here: /opt/Xilinx/SDSoC/2015.4/SDK/2015.4/data/ Embeddedsw/ThirdParty/opencv/lib )

4.3 Adding -RPATH-LINK
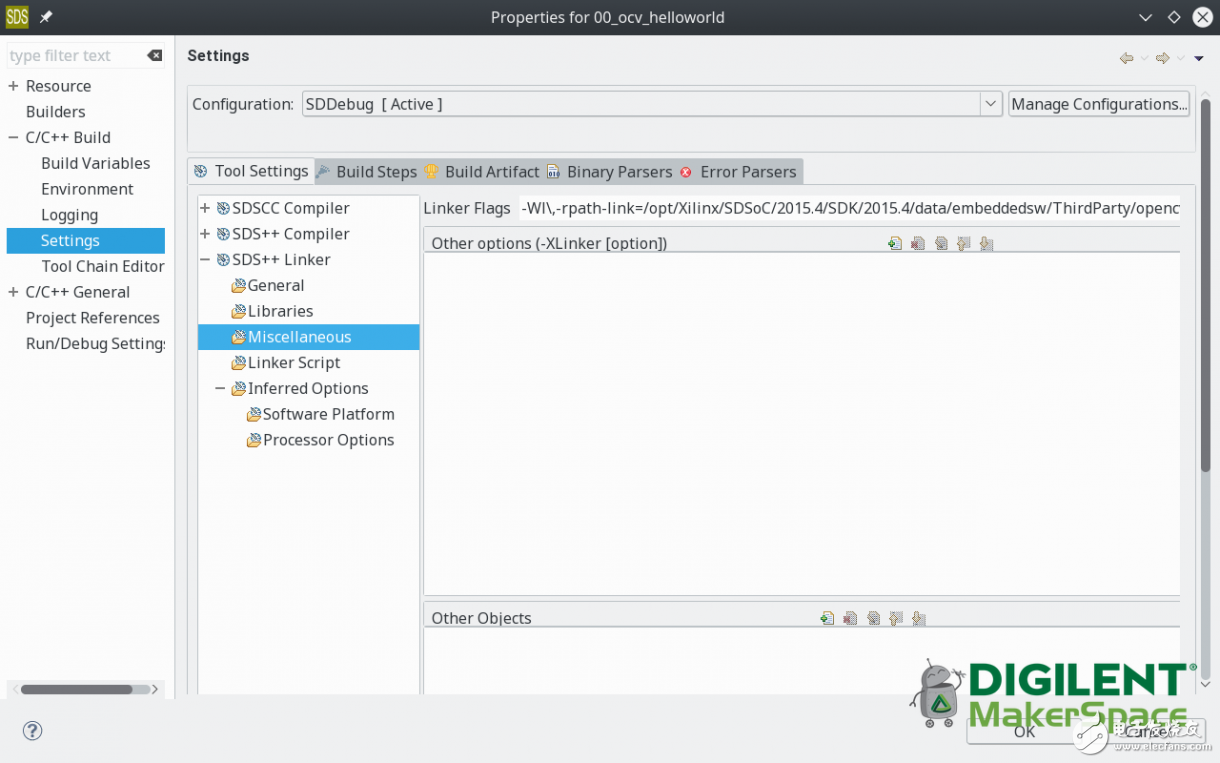
Finally, you need to specify the path so that the linker can search for the dependencies (libs) required by OpenCV. Go to the SDS ++linker configuration and add the following line under "Miscellaneous" - "Linker Flag" (-Wl, -rpath-link = / opt / Xilinx / SDSoC / 2015.4 / SDK / 2015.4 / data / embeddedsw / ThirdParty / Opencv /LIB). The -Wl option indicates to the toolchain the option -rpath-link = . . Will be provided to the linker.

Here, we are going to do the most exciting part of this article: testing! The following code will perform FAST feature point detection on an image:

Proximity Switch For Automobile,Proximity Switch For Industrial Control,Sensing Probe For Industry And Horticulture,Temperature Sensing Probe
Foshan City Jiulong Machine Co., Ltd , https://www.jlthermostat.com